Iphone 4s Ssh Jar
First off this has been put together from parts of other posts by other users who have gotten access to their phones in dfu mode. I have also gotten access to my phone. I decided to put up a simplified (I hope) tutorial for others. REQUIREMENTS: 1.
First download 2. Custom 4.2.1 ipsw created by PwnageTool or Sn0wbreeze(might work for other firmwares. Just use the appropriate one) 3. Tetheredboot utility from 4. Itunnel_mux (rev71): 5. Putty(ssh client): 6.
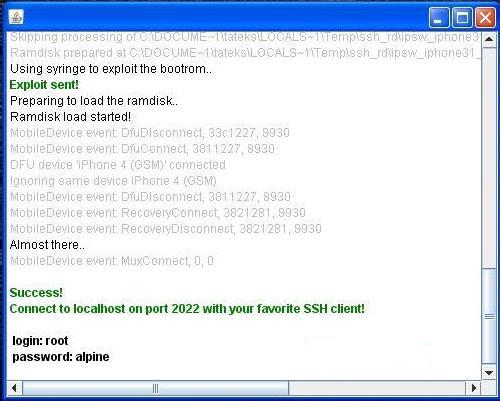
(1) ssh jar download ssh jar here. Click here (2) winscp download winscp using link above (3) tinyumbrella using link above 1. Put device into DFU mode 2. Run ssh.jar wait until it says successful 3. Open winSCP 4. Open a new connection 5. Host name: 127.0.0.1 6. Port: 2022 7. Login: root 8. Password: alpine 9. Press the terminal button in winSCP and type: mount.sh 10. Mar 27, 2015 Once JRE-7 file is installed, then you need to open ssh_rd_rev03b.jar file that you downloaded earlier. Upon opening it, it will ask you to connect a device in DFU mode. Plug your iPhone in and put it in DFU mode.

Cyberduck: PROCESS: 1. Create a 'NEW FOLDER' and put it in your desktop. Mbro usb nokia tools lite download. Extract everything (except the custom ipsw) to 'New Folder' 3. Extract the custom 4.2.1 ipsw (I use 7-zip) to a temporary folder named IPSW From the temporary folder(IPSW), find and copy to 'New Folder' a. IBSS.n88ap.RELEASE.dfu(located in the firmware folder) b.
Kernelcache.release.n88(extracted from IPSW) c. DeviceTree.n88ap.img3(located in all flash all_flash.n88ap.production folder) Put phone in DFU mode 4. Execute: jre-7-windows-i586-iftw.exe.
This is what you should see when running it. When the phone shows that put the phone back in to DFU mode. Open a cmd.exe window (run as admin) and navigate to 'New Folder' (this is the folder where you saved everything.) Right click on them and drag them to your local disk which should be c: Then type in the command window the following: tetheredboot exe. -i iBSS.n88ap.RELEASE.dfu -k kernelcache.release.n88 -r 038-0082-001.dmg.ssh then hit enter you should see the following: then this: 5: in the command window(cmd.exe) type in the folowing: itunnel_mux --lport 22 it then should look like this: DO NOT CLOSE THE WINDOW 6: Open a new cmd.exe window(run as admin) 7: open putty and do the following: where is says 'HOST NAME (or Ip address) endter the words localhost(all one word) port is 22 and click open. It should look like this: if says something about saving the authenication key click yes. After that putty will open. Enter the following: login as: root 's password:alpine (it won't show it on the screen) should look like this: To mount / (root) filesystem (contains system settings & files, MobileSubstrate dylibs, etc) type what is posted past the # sign then press enter.
8: -sh-4.0# fsck_hfs /dev/disk0s1 9: -sh-4.0# mount_hfs /dev/disk0s1 /mnt1/ Mount /usr filesystem (everything else, IE: music, media, photos, apps, data, etc) 10: -sh-4.0# fsck_hfs /dev/disk0s2s1 11: -sh-4.0# mount_hfs /dev/disk0s2s1 /mnt2/ To set the path correctly so you can easily navigate the filesystem: 12: -sh-4.0# PATH=$PATH:/mnt1/bin Congratulations, you now have full root access up to this point, the iDevice has NOT been modified in any way --- so be careful! After you're done messing around, play it safe - execute: sync; sync; sync This will flush any pending filesystem writes.